Page Contents
Important note (23 Nov 2008)
Since I created this wiki, I have become aware that there has been a new and improved version of the "urban_conflict" map released. This version addresses some performace and stability issues. The new version of the urban_conflict.bundle has a file size of 38,982,490. The new version has a slightly different file structure and I'll need to go through and update the wiki. Until this is done, be aware that some of the images on the wiki(and in the videos) may differ from your version of urban_conflict. The downloads section of ghostrecon.net has been updated with the latest version of urban_conflict
The basic sequence of making a coop mission from a new map
Transcript of video - you might like to print this out to make it easier to follow when you are doing it yourself.
In following the above movie you will need to know the following shortcuts when using the map editor :
Spacebar to unlock movement

Ctrl K to calcluate the AI graph
Ctrl S to save
Alt F4 to exit the editor - make sure you save first.
F6 to adjust normal lighting for better visibility
Process flow diagram
Work out and write down on paper the plot and flow for your mission
Step 1. Decide on the way you like to storyboard.
I like simple pencil and paper...but some may like typing it out in electronic form or in drawings.
Step 2 Outline the main themes of the mission
Then add the key steps necessary to accomplish each phase of the mission.
Is it a stealth mission? Run and Gun? Fast paced or slow and careful? or both? Loads of snipers or just a few. Do helicopters or vehicles have a role to play? Is the story believable? Think back to the original GR...is it a Ghost Recon story? And I stress the word recon.
Step 3 Select a map that matches the story.
There are many custom maps out there, and most come with a set of pictures that will give you a feel for the style of map. It may take some time to find a map that suits your story line and infact, you may find yourself changing the story to fit in with the map...but try and keep to the essence of your original story. Some may like to select the map and then make the story fit, that's ok too.
Download the map and unbundle it. In there you will see a mimimap (or look in the world.xml for the reference to the minimap). This is an overhead view of the map. Open it up and print it out in large format (I recommend using Paint.net - see the software section of the wiki). Do a few copies of it.
Step 4 Visualize how each phase of the mission will play.
How will the players move through the map, how will they interact with the various challenges, what role will vehicles play? Are there natural choke points? What surprises can you include for the players? What have you seen work well in other missions? Consider how things got there - eg. a tank in the middle of a closed area is not very realistic.. Avoid the temptation to overcomplicate things or make it unrealistic though - more is not better.
Step 5 Write the storyboard in a scene-by-scene format, including notes and images.
Number each scene scene_1, scene_2 etc. For example, Scene_1 might be securing the insertion zone, Scene_2 might be escorting allied troops to the meeting point etc etc. This will form the basic structure of your mission script. Draw where players will insert and leave. Draw zones on the map that will trigger activity/action, draw where vehicles might be or move to, draw likely choke points, snipers, MG's, enemy movement, ADATs etc etc.
Now you have everything you need to create the mission. You know...
- Where the players will start and leave (coop_spawn/extraction zone)
- The objectives/key locations (objectives)
- What prop's you'll need - vehicles (dynamic props) , gun emplacements/barricades (static props)
- Enemy placement (humans) and their movement (paths and AI graph)
- Zones and trigger points (locations and triggers)
All that remains is to place these on the map and write the script to make them react according to your story-line. Simple!
Setup the map/mission files in the local folder
For this example mission, I am going to use the map urban_conflict. It is available on ghostrecon.net, but you can use any map you like...the principle is the same, but the files in the bundle may differ for different maps.
One thing to check is that you do not already have this .bundle in your "Ghost Recon Advanced Warfighter 2/custom_levels".
If you do, you will need to remove the file from the "Ghost Recon Advanced Warfighter 2/custom_levels" folder as it will conflict with the extracted files you are about to put into the "Ghost Recon Advanced Warfighter 2/data" folder.
(ie. remove "urban_conflict.bundle" from Ghost Recon Advanced Warfighter 2/custom_levels" before creating your own custom mod.
We'll show you how to resolve this conflict later in the wiki (Publishing your coop mission). But for now, let's keep it simple and safe.
If you do not, you will get an error like this... "Custom level bundle coop_urban_conflict contains an invalid file path".

Download your map and extract the map bundle to a temporary folder (see above for instructions on this).
The extracted data folder will now contain your map/custom level files and look something like this…

Check that your Ghost Recon Advanced Warfighter 2/data directory only contains the following folders : movies, settings and sounds. If there are other folders here, (and I am assuming you are not already working on other maps), delete the other folders, but leave movies, settings and sounds.
Copy the contents of the extracted bundle data folder into your Ghost Recon Advanced Warfighter 2/data directory. It will now look like this.

Change folders and XML’s to work for coop
Clean up and re-order the missions files
The first thing to do is to rename the remove any ".xmb" files from the coop_<mapname> (eg coop_urban_conflict) folder. These are compiled .xml. The game will use these over the native .xml files. So if you make a change to an .xml, it will not be seen in the game if there is also a matching (old version) .xmb. So be sure to delete them to eliminate any confusion.
Put the world.xml and unit_list.xml into their own directory, /xml (if they are not there already)
The world.xml file contains all of the elements you'll add or change in the GRAW 2 map editor. It literally describes the GRAW 2 world. Each time you change and save the world in the map editor, (ie. add a mexican and press Ctril-S to save) the editor will save a backup copy of the "old" world.xml as world_xx.xml - where xx is a version number starting from 1. ie. the next time you save, it'll savea backup as world_2.xml and then world_3.xml etc. This can create a lot or "old"/backup copies of world.xml when creating maps/missions. This is very handy if you want to roll back to a previous version, but can create alot of clutter - it's not uncommon to have 50 old versions of the world.xml file. For this reason, I recomend that you put the world.xml (and the associated unit_list.xml) into a sub folder in the mission folder. This folder is usually called "/xml". Most missions already have this structure, but if they do not it's easy to set up.
1) Make a new folder called xml in your mission folder
2) Move world.xml and unit_list.xml into the folder. It should now look like this...

3) open up world_info.xml and change the following line to point to the new folder

Change the mission folder name
The first thing to do is to change the name of the map folder from <mapname> to coop_<mapname> (eg from urban_conflict to coop_urban_conflict).
ie. change "C:\Program Files\UBISOFT\Ghost Recon Advanced Warfighter 2\Data\levels\custom_levels\urban_conflict" to...
"C:\Program Files\UBISOFT\Ghost Recon Advanced Warfighter 2\Data\levels\custom_levels\coop_urban_conflict"
The mission.xml and world_info.xml that come with the map have been designed for player vs. player games (tdm - team death match, hh - hamburger hill, s - siege, rvsa - recon vs. assault) and so you need to change it to cater for the coop game type. You do this by opening it up in the editor and removing the other xml tags that relate to the other game types and adding the world_info tag for coop.
Set up the mission.xml for coop game play.
The easiest way to do this is to use a pre-created template.
1) Rename the old mission.xml to mission_original.xml (just in case you want to look at it again later).
2) click on this link to download my template mission.xml. It's a zip file so just unzip it into your mission folder.
And that's the mission file created. Easy huh! Feel free to take a look at it in the XML Marker editor, it's just a skeleton, but once we make a few other changes, it'll be enough to start testing the map in GRAW 2.
Change the world_info.xml to set it up for coop.
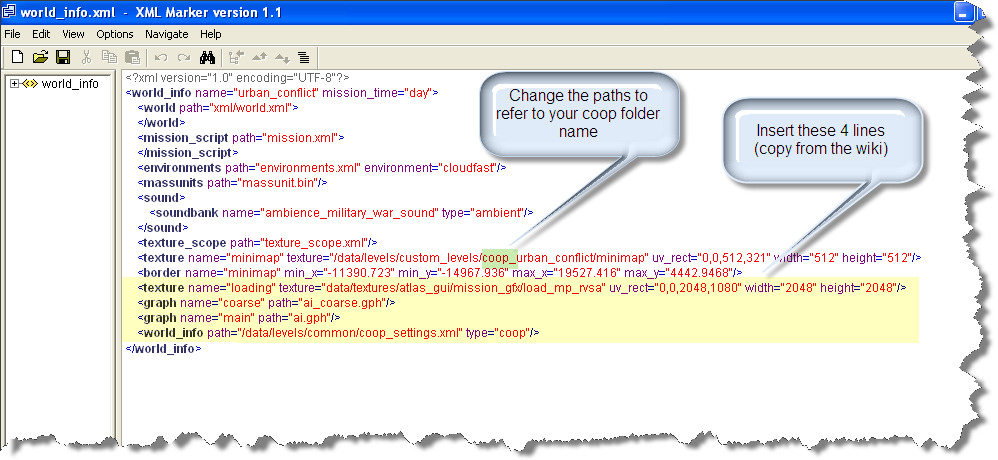
For example, the urban_conflict map's world_info.xml looks like this...

To set this up for a coop mission, You should remove the highlighted lines from the script and replace them with the following lines in their place...
|
<texture name="loading" texture="data/textures/atlas_gui/mission_gfx/load_mp_rvsa" uv_rect="0,0,2048,1080" width="2048" height="2048" />
<graph name="coarse" path="ai_coarse.gph" />
<graph name="main" path="ai.gph" />
<world_info path="/data/levels/common/coop_settings.xml" type="coop" />
|
You will also need to change some of the path names so that they refer to your new directory name of coop_<mapname>, in this case coop_urban_conflict.
These tell the game to...
1) Use a standard image when the game is loading (we'll learn how to change this image later to a custom image).
2) Where the AI graph is - this tells the AI where they are allowed to go (you will generate this in a the map editor in one of the following steps).
3) to run this map as a coop map.
So now your script will look like this...
Note that sometimes people who make maps do not follow the "standard" format for the world_info.xml (ie. they put extra info. or have files in different directories etc), but mostly they do, so let's deal with any exceptions later.
Have alook at the above world_info.xml and make sure you are comfortable with the structure and the tags used. You can find more info. on this in the GRAW2 tutorial that came with the game.
Preparing to run the GRAW 2 editor
To make it easier to open up the map in the editor we will create a batch file.
Open notepad and type in the following command line (modify path and mapname for your needs - note the quotes are required).
"C:\Program Files\UBISOFT\Ghost Recon Advanced Warfighter 2\graw2.exe" -o context-editor.xml -path coop_urban_conflict
Save the file as editor.bat. Now when you click on this batch file it will open up your map in the editor.
The following is an explanation of the parts of the command so you can customise it to suit your needs.
C:\Program Files\UBISOFT\Ghost Recon Advanced Warfighter 2\graw2.exe – the full path to where you installed graw2
-o – switch that tells the editor you want to open a map
context-editor.xml – contains set-up/environment information for the editor
-path coop_arroyo – pathname to the map you want to open, in this case coop_urban_conflict. Naturally you'll need to change this to match your map name.
In the map editor, create some basic locations, AI and humans in the editor
Now we'll open up the editor (by double clicking on the batch file created in the above step) and create a few items so we can test the map in the game. To do this, we need at a minimum create an AI graph and a location called coop_spawn. We'll also add an enemy soldier just for fun.
Open up the editor (double-click on the editor.bat you created earlier) and once the editor has loaded move around the map (using space to unlock "flying" mode) and the W, A, S, D keys and the mouse to move about the map.
You can speed up or slow the movement using the mouse wheel.
1) create the locations used in the mission.xml. From the editor menu, select locations and create the following square locations on the ground. Remember where they are so when you load the map in GRAW to test, you can move to them easily. You can move/recreate them later after we test the map.
coop_spawn : the initial spawn location for the ghosts
loc_trig01 : the first trigger location - causes the enemy patrol to spawn
loc_trig02 : another location on the map. Displays a message on the screen...up to you to make it do more :)
loc_extraction : the location the ghosts need to get to to extract
2) select AI graph from the menu and create a simple set of AI graph points (say 10 or so) in an area where your mexican soldiers would move and generate the graph by pressing coltrol-K while in the editor. This will create the AI.gph and ai_coarse.gph files. (see below for a detailed video on how to do this.)
3) select Human from the menu and create a mexican soldier. Be sure to place them in the area covered by the AI graph you created in step 2). Give them a group name of "patrol01". You can leave them with Guard orders for now.
Save the map (control-s) and exit the editor (alt-F4).
We are now ready to test the map in GRA:W2!
Run GRAW2 and test that the "base" mission loads ok in GRAW2 (no enemy etc).
Run graw2 as normal, select multiplayer, LAN game, create server and select the coop map you created. All going well, you'll now be playing your new coop map!
If you get an error, try and correct it (refer to the common errors section of the wiki) and if you can not work it out, post in the graw2 forums on ghostrecon.net.
Create the mission in phases/stages.
Phase 1 - The first few minutes.
Editor - In the editor, create the first phase of the mission
Static objects
Locations (trigger zones)
Comments (0)
You don't have permission to comment on this page.